かんたんパララックスでAnimation Worklet APIを試してみた
Google Chrome 71よりOrigin Trialsに予定されている、CSS Animation Worklet APIを試してみました。
Animation Worklet APIとはCSS Houdini タスクフォースが策定しているAPIのひとつです。このAPIを用いることで、ハイパフォーマンスなWebアニメーションやスクロールと連動したアニメーションの実装が可能になります。
このAPIをGoogle Chrome 71(2018年11月現在Bata版)で試すには、chrome://flagsから「Experimental Web Platform features」をEnabledに設定するか、特定のオリジンに対する期限付きトークンを取得する必要があります。(取得方法やOrigin Trialsの詳細はOrigin Trials Guide for Web Developersを参照ください)
Animation Worklet APIの基本的な使い方
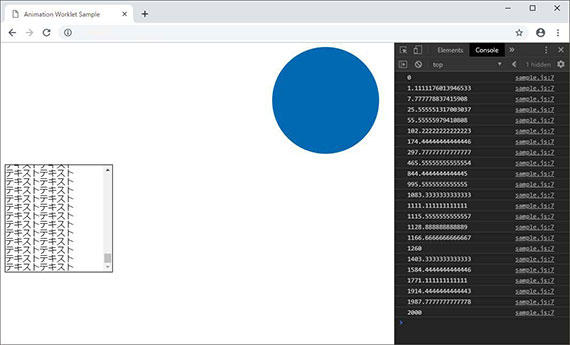
まずはキャプチャのようにボックスをスクロールすると丸が左から右に移動するデモを作成してみたいと思います。
<div id="circle"></div>

<div id="scroll-area">
<p>テキストテキスト</p>
<p>テキストテキスト</p>
<!-- (中略) -->
<p>テキストテキスト</p>
<p>テキストテキスト</p>
</div>

<script>
(function(window, document){
  if(!'animationWorklet' in CSS) {
    return;
  }

  async function sampleAnimation(){
    await CSS.animationWorklet.addModule('sample.js');

    const scrollTimeline = new ScrollTimeline({
      scrollSource: document.getElementById('scroll-area'),
      orientation: "vertical",
      timeRange: 2000
    });

    new WorkletAnimation(
      'sample-animation',
      new KeyframeEffect(
        document.getElementById('circle'),
        [
          {
            transform: 'translateX(0) scale(0.2)'
         },
          {
            transform: 'translateX(500px)'
         }
        ],
        {
          duration: 2000,
          fill: 'both'
        }
      ),
      scrollTimeline
    ).play();
  }

  sampleAnimation();
}(window, window.document));
</script>
アニメーターの定義
まずはじめにAnimation Workletの`registerAnimator()`を用いてアニメーション用のクラス(アニメーター)の定義を行います。
// sample.js
registerAnimator('sample-animation', class {
  animate(currentTime, effect) {
    effect.localTime = currentTime;
  }
});
Animation Workletとはアニメーションに関するブラウザのレンダリングプロセスにアクセスできる軽量なWeb Worker(Worklet)です。メインスレッドとは別のスレッドでAnimation Workletの処理が実行されるため、Animation Workletで実行する処理がメインスレッドに影響を与えることはありません。(参考:2. Threading Model)
animate()はブラウザがレンダリングするフレームごとに呼び出されており、アニメーションのタイムラインの現在時間(currentTime)をeffect.localTimeに設定することで、メインスレッドで実行されるKeyframeEffect()を制御しています。
次にこのAnimation Workletを、メインスレッド側で読み込みます。
await CSS.animationWorklet.addModule('sample.js');読み込みが完了するとAnimation Workletを用いてアニメーションの作成が開始できるようになります。
タイムラインの設定
WorkletAnimation()の構文自体はWeb Animations APIと似ていますが、Animation Worklet API特有の設定が2点あります。1点目はアニメーターの登録、2点目はアニメーションのタイムラインの設定です。
new WorkletAnimation(
  'sample-animation',
  new KeyframeEffect(
    document.getElementById('circle'),
    [
      {
        transform: 'translateX(0) scale(0.2)'
      },
      {
        transform: 'translateX(500px)'
      }
    ],
    {
      duration: 2000,
      fill: 'both'
    }
  ),
  scrollTimeline
).play();WorketAnimation()の第1引数には、先ほど設定したアニメーターを指定しひもづけます。
またタイムラインの設定に関して、Animation Worklet APIでスクロールとアニメーションを連動させるにはdocument.timelineの代わりにScrollTimelineを指定します。
const scrollTimeline = new ScrollTimeline({
  scrollSource: document.getElementById('scroll-area'),
  orientation: "vertical",
  timeRange: timeRange // 2000
});scrollSourceで設定されたエリアにおいて、timeRangeをスクロールの最大可能域したときのスクロール位置がアニメーターのcurrentTimeに渡されます。スクロール位置が0のときはcurrnetTimeが0になり、最後までスクロールし終わった際はtimeRangeで設定した値(今回の場合は2000)になります。このようにスクロールの位置がeffect.localTimeと連動することで、スクロールと連動したアニメーションのタイムラインを実現しています。
パララックスを実装する
上記を応用して簡単パララックスを実装してみました。
主要コードを抜粋します。
await CSS.animationWorklet.addModule('animation-worklet.js');

const timeRange = 2000;
const scrollTimeline = new ScrollTimeline({
  scrollSource: document.scrollingElement,
  orientation: "vertical",
  timeRange: timeRange
});

new WorkletAnimation('sample-parallax',
  new KeyframeEffect(
    targets.ornament.var1,
    [{
      'transform': 'translateY(0) scale(1)',
      'fill': '#92d3ff'
    },
   {
      'transform': 'translateY(-100vh) scale(0.5)',
      'fill': '#f7fdff'
    },
    {
      'transform': 'translateY(-200vh) scale(1)',
      'fill': '#70bee2'
    }],
    {
      duration: timeRange,
      fill: 'both'
    }
  ), scrollTimeline, { rate: 0.9 }
).play();

new WorkletAnimation('sample-parallax',
  new KeyframeEffect(
    targets.ornament.var2,
    [
      { 'transform': 'translateY(0) rotate(0)' },
      { 'transform': 'translateY(-200vh) rotate(360deg)' }
    ],
    {
      duration: timeRange,
      fill: 'both'
    }
  ), scrollTimeline, { rate: 0.7 }
).play();

// ...
要素個別にそれぞれ同じアニメーションを設定しますが、速度の違いについては`rate`をオプションとして設定し、アニメーターに渡すことで速度に差をつけています。
// animation-worklet.js
registerAnimator('sample-parallax', class {
  constructor(options) {
    this.rate = options.rate;
  }

  animate(currentTime, effect) {
    effect.localTime = currentTime * this.rate;
  }
});
まとめ
実際に試してみて、なめらかなアニメーションもさることながら簡単にスクロール連動のアニメーションを実装できる点が非常に便利だと感じました。
Animation Worklet APIは対応ブラウザの関係から実務での導入はまだむずかしそうですが、従来のパララックスより実装が簡単でパフォーマンスにも優れるので他のHoudiniの仕様同様実装動向から目が離せませんね。
CSS Houdiniの他のAPIに関しても当ブログで紹介していますので、よろしければご覧ください!